
前言:
這是一篇為了 04/18 跟 Google Developer Group 合作的 BUILD WITH AI (BWAI) WORKSHOP 的最後一篇文章,畢竟晚上就要工作坊了(投影片可以當場弄,文章可來不及當場寫 XD )。
請記得,如果你想知道以下相關知識:
- 如何申請 LINE Developer 帳戶,如何建立一個 LINE OA (ChatBot) Channel? (範例: 辨識圖片 LINEBot)
- 如何透過 Google Cloud Functions 使用 Google Credential 來操作 Firebase Realtime Database (範例: 具有長記憶的聊天機器人)
本篇文章將專注在以下幾個部分:
- 將兩個範例程式 名片小幫手(舊版用 notion)與收據小幫手(Python 舊版) ,改寫成 Golang 。
- 分享 Golang 在操作 Firebase Realtime Database 資料庫上幾個需要注意的地方。
- 最後分享做 Gemini-Vision 的一些心得與未來可以改善的空間。
文章列表:
- [BwAI workshop][Golang] LINE OA + CloudFunction + GeminiPro + Firebase = 旅行小幫手 LINE 聊天機器人(1): 景色辨識小幫手
- [BwAI workshop][Golang] LINE OA + CloudFunction + GeminiPro + Firebase = 旅行小幫手 LINE 聊天機器人(2): Firebase Database 讓 LINEBot 有個超長記憶
- [BwAI workshop][Golang] LINE OA + CloudFunction + GeminiPro + Firebase = 旅行小幫手 LINE 聊天機器人(3): 導入「名片小幫手」跟「收據小幫手」
- [BwAI workshop][Golang] LINE OA + CloudFunction + GeminiPro + Firebase = 旅行小幫手 LINE 聊天機器人(4): 關於 Gemini Pro 伺服器的相關修改導致 unknown field
usageMetadata的錯誤訊息
程式碼列表:
- 名片小幫手(舊版用 Golang + Notion)
- 收據小幫手(Python 舊版)
- 辨識圖片 LINEBot
- 具有長記憶的聊天機器人
- 名片小幫手(新版: Golang + Firebase RealtimeDB + Cloud Functions)
- 收據小幫手(新版: Python -> Golang + Firebase DB + Cloud Functions)
事前準備
- LINE Developer Account: 你只需要有 LINE 帳號就可以申請開發者帳號。
- Google Cloud Functions: GGo 程式碼的部署平台,生成供 LINEBot 使用的 webhook address。
- Firebase:建立Realtime database,LINE Bot 可以記得你之前的對話,甚至可以回答許多有趣的問題。
- Google AI Studio:可以透過這裡取得 Gemini Key 。
務必確定已經有前兩篇文章的環境,並且該 Cloud Functions 已經串接好 LINE Bot 。

名片小幫手的導入:
- 將程式碼: https://github.com/kkdai/linebot-cf-namecard 裡面的
function.go打開。 - 複製到 Cloud Functions 中已經設置好的環境。
- 記得在 Firebase Realtime Database 建立一個新的 set -
namecard
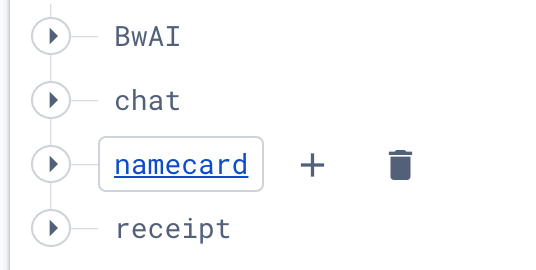
- 部署 (搭啦)
名片小幫手程式碼修改部分
首先,將原本透過 Notion 作為 DB 改成 Firebase Realtime Database 之後。首先需要定義相關資料結構。
// Person 定義了 JSON 資料的結構體
type Person struct {
	Name    string `json:"name"`
	Title   string `json:"title"`
	Address string `json:"address"`
	Email   string `json:"email"`
	Phone   string `json:"phone"`
	Company string `json:"company"`
}
資料寫入的部分,這邊使用到 Firebase Database 中的 Push 。相關的官方說明如下:
Add to a list of data in the database. Every time you push a new node onto a list, your database generates a unique key, like messages/users/<unique-user-id>/<username>
也就是說,資料是用類似以下方式儲存:
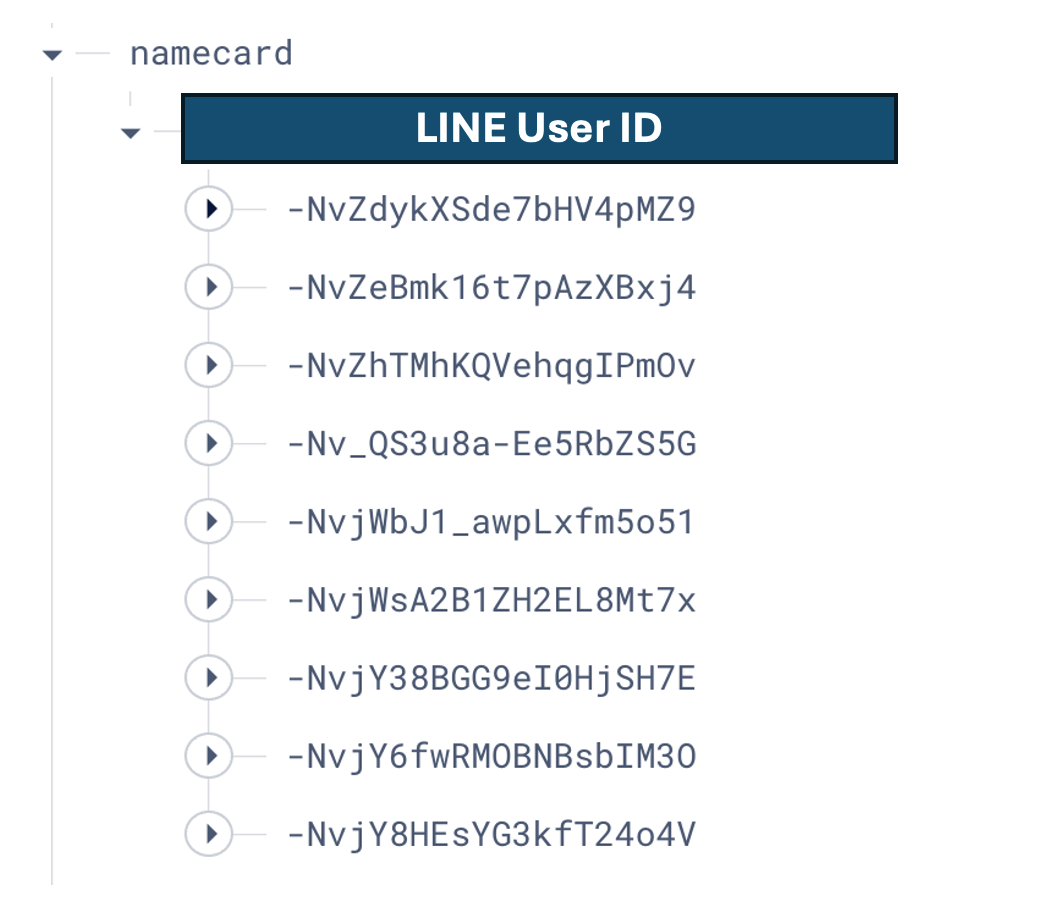
儲存之前很簡單,不需要額外資料轉換。只需要直接 Push 進去,前面會加上一個唯一的 key 值。
				const DBCardPath = "namecard"
				.....

				// Insert the person data into firebase
				userPath := fmt.Sprintf("%s/%s", DBCardPath, uID)
				_, err = fireDB.NewRef(userPath).Push(ctx, person)
				if err != nil {
					log.Println("Error inserting data into firebase:", err)
				}
但是在前面取用的時候,就會比較複雜。因為要完整把整包 JSON 都抓下來後處理。需要以下變動。
				// Load all cards from firebase
				var People map[string]Person
				err = fireDB.NewRef(userPath).Get(ctx, &People)
				if err != nil {
					fmt.Println("load memory failed, ", err)
				}

				// Marshall data to JSON
				jsonData, err := json.Marshal(People)
				if err != nil {
					fmt.Println("Error marshalling data to JSON:", err)
				}
透過一個 string key map var People map[string]Person 來處理這樣的資料格式,再來直接轉換成 JSON 。這樣又可以將資料完整抓下來變成 Gemini 可以閱讀的方式來處理。
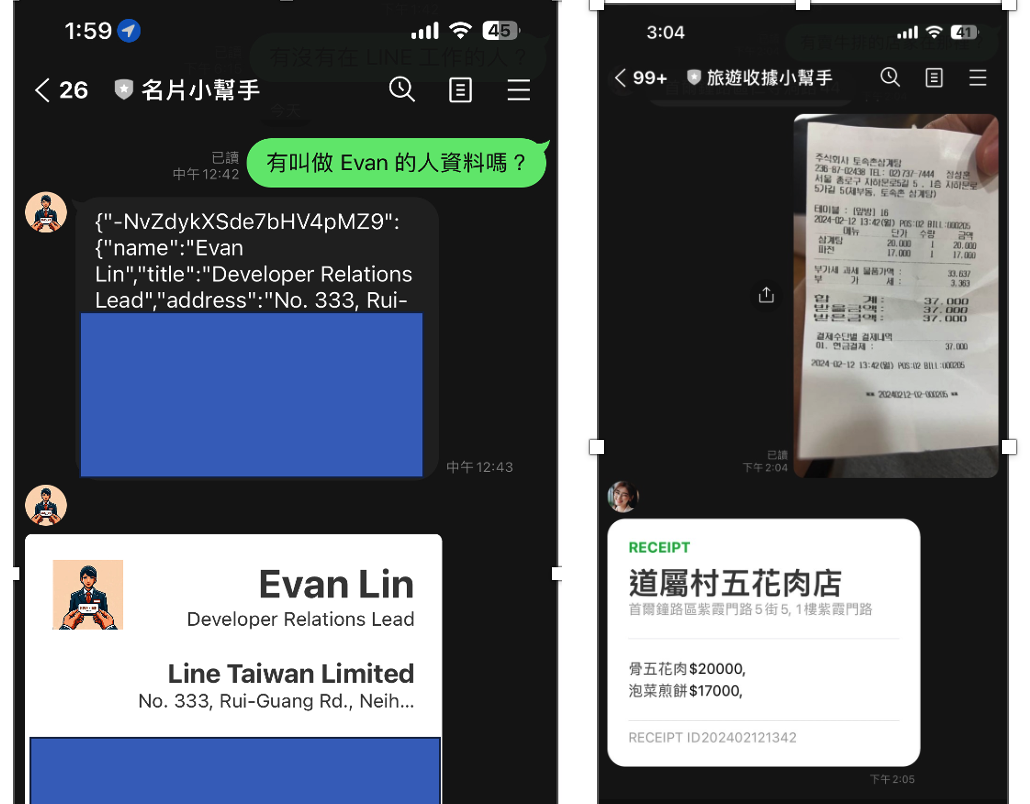
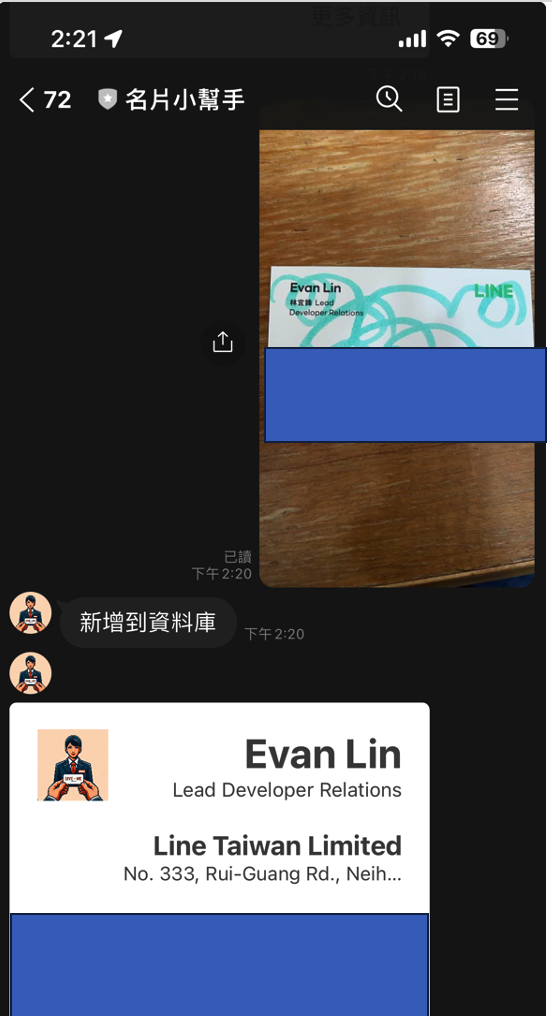
名片小幫手改進後相關成果
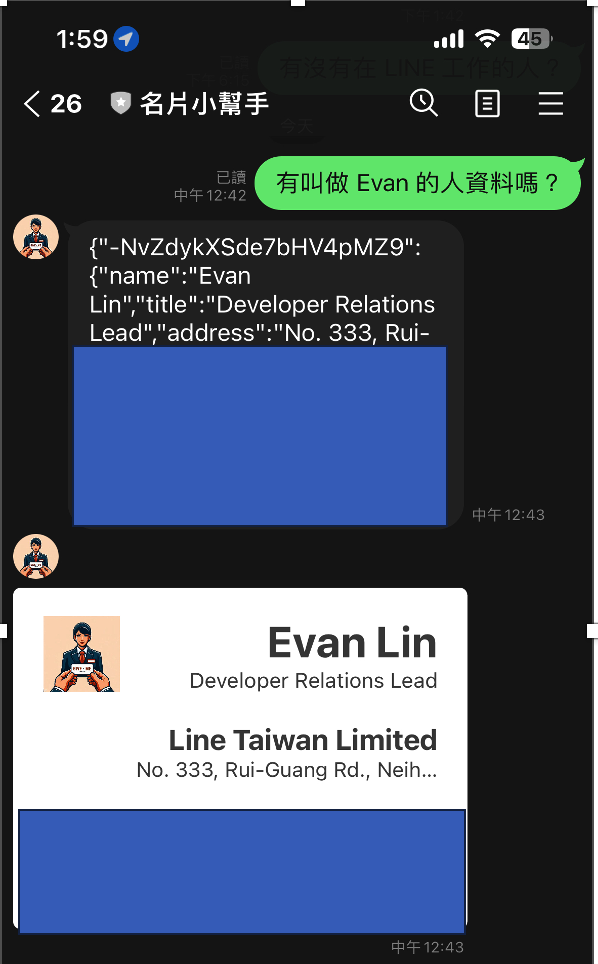
程式碼: 名片小幫手(Go Cloud Functions版本):https://github.com/kkdai/linebot-cf-namecard
這裡備註一些主要修改,跟優化的部分:
- 由於使用 Firebase Database ,整包 JSON 丟給 LLM 變得更加聰明。
旅遊收據小幫手導入
開發起因
首先快速講一下,旅遊收據小幫手的開發起因:
- 今年過年去了一趟韓國首爾遊玩,但是在路上會收到一堆的單據。
- 因為筆者是韓文苦手,無法讀懂韓文。但是又希望可以有效地查詢相關的資訊。
- 查詢方式可能想知道哪一天買了什麼,或是哪個商品是在哪一天?哪一個店家購買?
導入方式
- 將程式碼: https://github.com/kkdai/linebot-cf-receipt 裡面的
function.go打開。 - 複製到 Cloud Functions 中已經設置好的環境。
- 建立一個 Firebase Database set:
receipt - 部署 (搭啦)
旅遊收據小幫手修改部分
Python 轉換成 Golang ,這部分就不細講了。 我們來看看跟前一個部分主要修改部分:
const ImgagePrompt = `This is a receipt, and you are a secretary.
Please organize the details from the receipt into JSON format for me.
I only need the JSON representation of the receipt data. Eventually,
I will need to input it into a database with the following structure:

 Receipt(ReceiptID, PurchaseStore, PurchaseDate, PurchaseAddress, TotalAmount) and
 Items(ItemID, ReceiptID, ItemName, ItemPrice).

Data format as follow:
- ReceiptID, using PurchaseDate, but Represent the year, month, day, hour, and minute without any separators.
- ItemID, using ReceiptID and sequel number in that receipt.
Otherwise, if any information is unclear, fill in with "N/A".
`
先來看收據辨識的 Prompt。首先:
- 先跟他說他要讀取的是哪一些資料,要如何去處理它。
This is a receipt, and you are a secretary. Please organize the details from the receipt into JSON format for me. I only need the JSON representation of the receipt data. Eventually, I will need to input it into a database with the following structure: - 在資料格式定義上,將收據單跟裡面每個商品品項切開成兩個項目。但是因為會一整包處理,裡面的資訊會被整合再一起。
Receipt(ReceiptID, PurchaseStore, PurchaseDate, PurchaseAddress, TotalAmount) and Items(ItemID, ReceiptID, ItemName, ItemPrice). - 額外處理項目需要註解,主要是資料讀不到的時候先補個 N/A。因為 Flex Message 必須每個欄位都要有數值。
Otherwise, if any information is unclear, fill in with "N/A".
這邊有多做一次的處理,就是收據原文都是韓文。需要額外跑一次將韓文的 JSON 轉換成中文再來儲存。
				// Pass the text content to the gemini-pro model for receipt translation.
				model = client.GenerativeModel("gemini-pro")
				transJson := fmt.Sprintf("%s \n --- \n %s", TranslatePrompt, ret)
				res, err := model.GenerateContent(ctx, genai.Text(qry))
				if err != nil {
					log.Fatal(err)
				}
				var transRet string
				for _, cand := range res.Candidates {
					for _, part := range cand.Content.Parts {
						transRet = transRet + fmt.Sprintf("%v", part)
						log.Println(part)
					}
				}
這樣才能讓自己比較能了解,並且在前面使用中文詢問的時候,也能取得比較好的答案。
雷點分享
- 請不要一次直接將韓文收據翻譯成中文,這樣成果會非常的糟糕。
- 建議都先掃描讓他可以直接得知道韓文成果,你也比較方便來比對答案。
旅遊收據小幫手成果
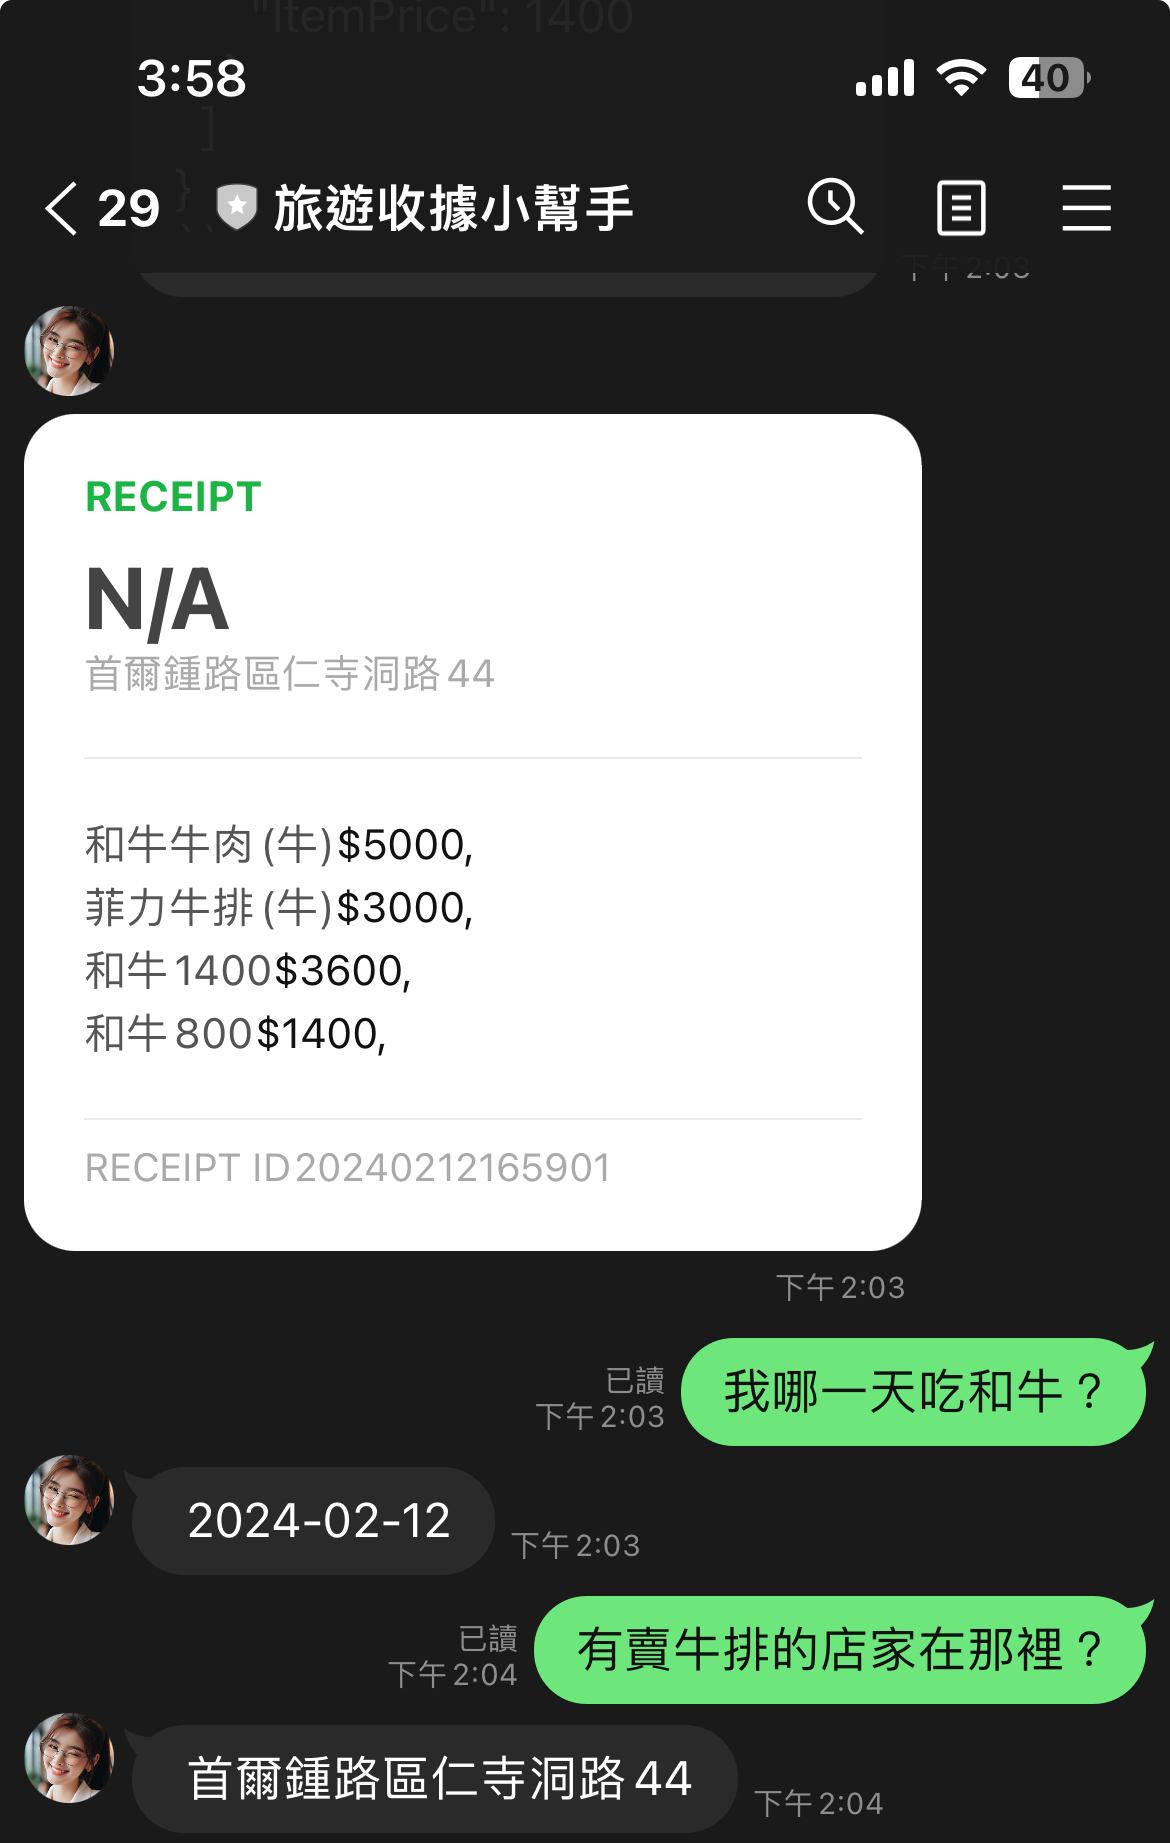
- 收據的掃描上,可能需要清楚一點的收據效果會更好。
- 詢問的部分可以變得相當的口語化,各種想問的都可以。
相關開發心得總結:
這裡提供開發「名片小幫手」跟「旅遊收據小幫手」過程中的一些心得。
GPT-Vision 可以讓以往 OCR 痛點被快速解決。
相關的應用開發過程中,筆者發現使用 GPT-Vision 可以讓掃描的成果比起 OCR 更容易接受。甚至可以接受更大的 range ,擺放歪了甚至是有被塗鴉過後,還是可以被識別。 而且以往使用 OCR 往往太複雜,需要對其邊界後,準備好相關套版最後才能掃瞄出答案。
透過優化 Prompt 與前處理可以讓成果更好。
在名片掃描過程中,筆者也發現使用英文名片的姓名辨識效果會比較好。可能的問題出在,因為中文名字就是沒有關連的三個文字,而英文名字在許多文章中都有出現過。 這邊建議可以透過簡單的 OCR 套件,將姓名或是公司名稱抓出來,來優化整體的處理效果。
試著透過 GPT-Vision 與 LINE Bot 來幫助你生活更輕鬆
在做 GPT-Vision 開發上,筆者發現 Prompt 的設定跟相關的前處理與後處理其實非常跟你的問題領域有關。如果用名片,就有名片相關的部分。反之,用收據的領域又大大不同。 如果要使用一些瀏覽器介面的時候,常常會有切換的問題。這時候建議直接開發一個 LINE Bot 讓你使用上相當的輕鬆又自在。
完整原始碼
你可以在這裡找到相關的開源程式碼:
- 名片小幫手(Go Cloud Functions版本):https://github.com/kkdai/linebot-cf-namecard
- 收據小幫手(Go Cloud Functions版本):https://github.com/kkdai/linebot-cf-receipt

