
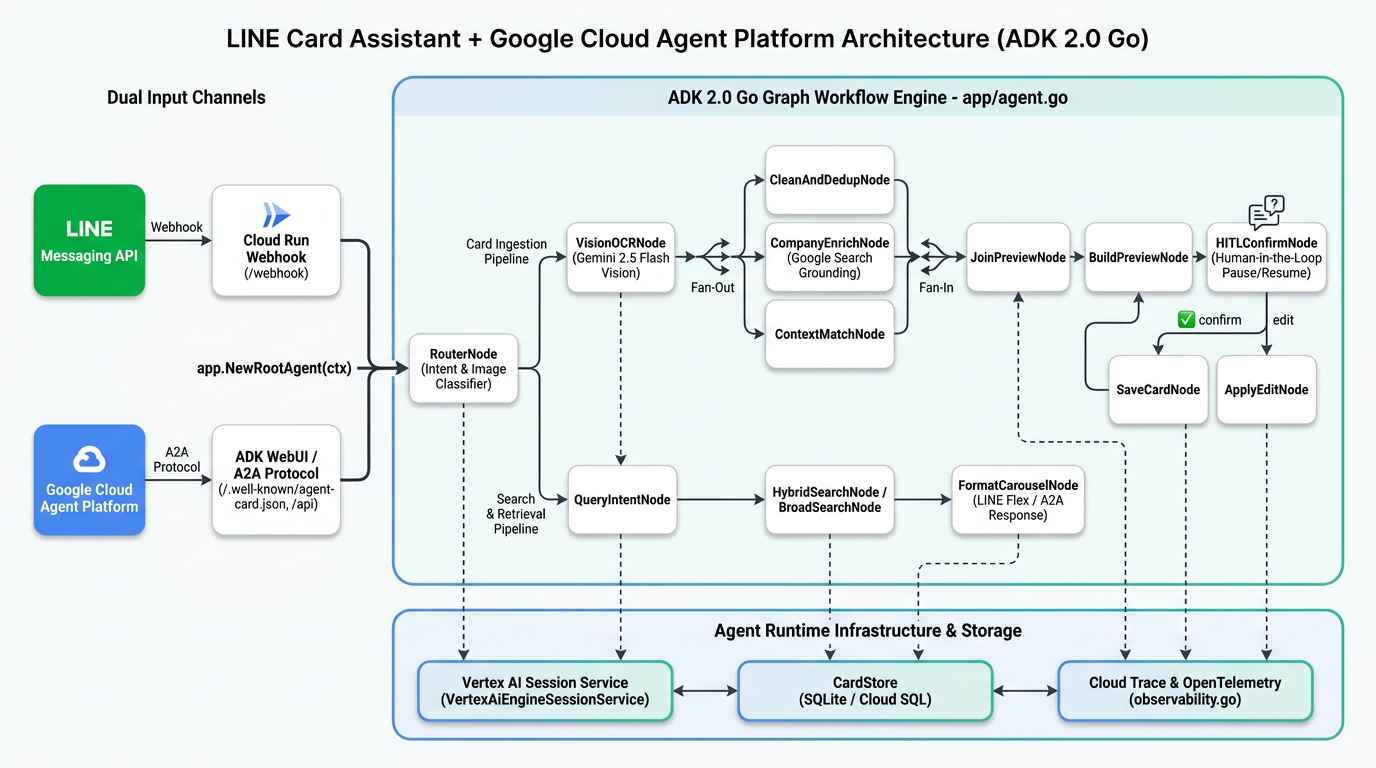
前情提要
在上一篇文章《[Agent Platform 實戰 (1)] 用 Go 與 Google ADK 2.0 Graph Workflow 打造 LINE AI 名片王》中,我們用 Golang (google.golang.org/adk/v2/workflow) 與 LINE Messaging API SDK v8 從零打造了 line-card-assistant(LINE AI 名片王),把 ADK 2.0 Graph Workflow 的四大核心能力 —— Deterministic Router 確定性路由、AddFanOut / AddFanIn 平行背景調查與匯聚、以及 NewRequestInputEvent Human-in-the-Loop (HITL) 暫停與迴圈修正 —— 完整跑通並部署到了 Google Cloud Run。
不過,當我們把這個單體式(Monolithic)的 LINE Bot 推上雲端後,若要進一步往企業級 AI Agent 平台(Production-grade Agent Platform)演進,馬上就會遇到幾個架構層級的叩問:
- 跨實例的 HITL Session 狀態保存在哪裡?
在第一版中,我們使用
session.InMemoryService()搭配本地 SQLite。當 Cloud Run 因為流量擴縮(Auto-scaling)或重新部署而切換 Container 實例時,正在等待使用者按下「✅ 確認儲存」的 HITL 暫停狀態(Checkpoint)就會因為記憶體重置而消失。 - 如何讓這個名片 Agent 被其他 Agent 呼叫(Agent-to-Agent, A2A)?
如果公司內部還有另一個「CRM 業務助理 Agent」或「行事曆排程 Agent」,希望能直接透過標準 A2A 協定 查詢我們名片王裡的聯絡人或請它代寫破冰信,綁死在 LINE Webhook
/webhook入口的單體伺服器是無法直接對外提供標準 Agent 介面的。 - 如何有系統地評估(Evaluate)與觀測(Observe)整張 Graph? 改了一行 Prompt 或調整了一個節點後,要怎麼確保 OCR 準確率、Fan-Out 平行工具呼叫軌跡(Tool Trajectory)與搜尋品質沒有退化?
為了解決從「寫出一個 Agent 原型」到「上線維運企業級 Agent」的鴻溝,Google 官方推出了全新的命令列與技能工具組 —— agents-cli (Google Agents CLI),作為 Google Cloud Agent Platform(現整合為 Gemini Enterprise Agent Platform) 的統一開發入口。
這篇系列文的第二集,我們就來深入導讀 agents-cli 官方開發指南,解答大家最常問的 Agent Runtime 擴縮容(Scale-to-Zero)與計費機制,並帶大家一步步看我們如何完成 Phase 1 架構升級(PR #10):在不破壞原本 LINE Bot 功能的前提下,將專案重構為符合 adk_go + agent_runtime 規範的雙通道架構!
一、深入解析 Google Cloud Agent Platform 與 agents-cli 官方指南
在動手改程式碼之前,我們先透過 Google 官方的《Getting Started - agents-cli》與《The Lifecycle - agents-cli》兩份核心文件,釐清 Google 在 Agent Platform 上的最新技術版圖。
1. 產品名詞對照:什麼是 Agent Platform 與 Agent Runtime?
如果你過去一年有追蹤 Google Cloud 的 AI 產品線,可能會聽過 Vertex AI Agent Engine、Reasoning Engine、Agent Platform 或 Gemini Enterprise Agent Platform (GEAP)。在最新的 agents-cli v1.10+ 規範中,官方將這些名詞與底層資源做了非常清楚的收斂:
| 開發者常說的名稱 | Google Cloud 官方定位與底層資源 | agents-cli 對應參數 |
|---|---|---|
| Agent Platform / Gemini Platform | Google Cloud 託管企業級 AI Agent 的整體平台(涵蓋 Runtime、Sessions、Memory Bank、Agent Gateway、Agent Registry 與 Eval) | 統一透過 agents-cli 操作 |
| Agent Runtime / Agent Engine | 專為 AI Agent 設計的全託管容器執行環境,底層 GCP 資源路徑為 projects/{project}/locations/{location}/reasoningEngines/{id} |
--deployment-target agent_runtime |
| Agent Platform Sessions | 雲端全託管的對話與狀態持久化服務(ADK 會自動綁定 VertexAiEngineSessionService) |
--session-type agent_platform_sessions |
| Gemini Enterprise / Agent Registry | 企業級 Agent 發布與目錄中心,讓部署好的 Agent 可直接在 Gemini 企業版介面或透過 A2A 被發現與調用 | agents-cli publish gemini |
2. agents-cli 的七階段開發生命週期 (The Agent Development Lifecycle)
過去我們開發應用程式習慣「寫 code → go test → gcloud run deploy」三步走;但在《The Lifecycle》文件中,agents-cli 定義了一套結合 Coding Agent Skills(支援 Antigravity CLI、Gemini CLI、Claude Code 等)的七階段品質飛輪(Quality Flywheel):
flowchart LR
    P0["Phase 0-1\nUnderstand & Recipes\n(.agents-cli-spec.md)"] --> P2["Phase 2\nScaffold\n(create / enhance)"]
    P2 --> P3["Phase 3\nBuild & Smoke Test\n(run / playground)"]
    P3 --> P4["Phase 4\nEvaluate\n(eval run 品質飛輪)"]
    P4 -->|迭代修正| P3
    P4 --> P5["Phase 5\nDeploy\n(agent_runtime / cloud_run)"]
    P5 --> P6["Phase 6-7\nPublish & Observe\n(Cloud Trace / BigQuery)"]
- Phase 0 & 1 — 需求定義與參考範本(Understand & Study Recipes):
在寫任何一行程式碼前,先將 Agent 的核心目標、外部工具、安全邊界與部署目標寫入專案根目錄的
.agents-cli-spec.md,作為整個開發週期的 Single Source of Truth。 - Phase 2 — 專案骨架生成(Scaffold):
透過
agents-cli scaffold create或針對既有專案執行agents-cli scaffold enhance .,自動產生符合官方規範的目錄結構、設定檔(agents-cli-manifest.yaml)、A2A 端點、Session 切換器與 OpenTelemetry 觀測模組。- 支援兩大官方內建模板:
adk(Python) 與adk_go(Golang)!
- 支援兩大官方內建模板:
- Phase 3 — 實作與本地互動驗證(Build & Playground):
- Go 專案只需專注在
app/agent.go中實作並匯出NewRootAgent(ctx)。 - 開發過程中可隨時用
agents-cli run "你的測試問題"進行終端機快速冒煙測試(Smoke Test),或執行agents-cli playground(或make playground)開啟瀏覽器視覺化互動介面測試多輪對話。
- Go 專案只需專注在
- Phase 4 — 自動化行為評估(Evaluate — 品質飛輪的核心):
官方特別強調:「Unit Test (
go test) 測的是程式碼合約與型別正確性;而agents-cli eval測的是 Agent 的行為品質(工具呼叫軌跡 Tool Trajectory、回覆品質與安全性)。」 - Phase 5 — 一鍵容器化部署(Deploy):
透過
agents-cli deploy將專案打包並部署至agent_runtime、cloud_run或gke,並自動將部署後的資源 ID 記錄於deployment_metadata.json。 - Phase 6 & 7 — 發布與生產環境可觀測性(Publish & Observe):
透過
agents-cli publish gemini註冊至企業目錄,並結合 OpenTelemetry 將所有的 Graph 節點耗時、LLM Prompt/Response 與 Token 消耗自動匯出至 Cloud Trace、Cloud Logging 與 BigQuery Agent Analytics。
3. Agent Runtime vs. Cloud Run vs. GKE:我該選哪一個部署目標?
agents-cli 支援三種容器化部署目標(底層全部都是讀取專案根目錄的 Dockerfile 進行建置,因此 Go 語言在三個平台都是一等公民)。我們根據官方 Deployment Decision Matrix 整理比較如下:
| 評估維度 | Agent Runtime (agent_runtime) |
Cloud Run (cloud_run) |
GKE (gke) |
|---|---|---|---|
| 基礎設施管理 | 全託管(專為 Agent 打造),自動由 Dockerfile 建置並掛載至 reasoningEngines |
容器化無伺服器託管,需自行設定網路與服務參數 | GKE Autopilot,具備完整 K8s 控制權但維運複雜度最高 |
| Session 狀態管理 | 原生內建 Agent Platform Sessions(執行期自動注入 GOOGLE_CLOUD_AGENT_ENGINE_ID 並啟用雲端持久化 Session) |
預設 In-Memory,需額外設定 Cloud SQL 或手動串接托管 Session | 預設 In-Memory,需額外設定 Cloud SQL 或托管 Session |
| API 與存取介面 | 內建 :query / :streamQuery、Console Playground、以及 /api/{container_path} HTTP Passthrough 與 A2A |
原生公開或 IAM 保護之 HTTPS URL,最適合直接接收外部 Webhook(如 LINE / Slack) | 自訂 K8s Ingress / Gateway |
| 企業進階整合 | 原生支援 Managed OAuth 2.0 User Consent、Agent Identity、Agent Gateway 與 PSC-I 私有網路 | 支援 VPC Egress、IAP,但不支援託管式 Agent OAuth 流程 | 完整 K8s 網路控制 |
| 計費模型 | 依實際使用的 vCPU-hours + Memory-hours 計費(閒置縮容至 0 時不計運算費) | 依 Request 期間或 Instance 秒數計費 | 依 K8s Node Pod 資源計費 |
4. 關鍵解惑:搬到 Agent Runtime 的 Instance 會不會 Scale to Zero?
在規劃將 line-card-assistant 遷移到 Agent Runtime 時,大家最關心的一個問題就是:
「根據
agents-cli的規範,搬到 Agent Runtime 的 Instance 是不是都不會 Scale 到 0、會一直常駐燒錢?」
答案是:Agent Runtime 支援 Scale to Zero(縮容至 0),而且 agents-cli 採取了非常聰明的「開發預設縮容至 0、生產環境預設預熱 1 台」的雙模式設計!
根據 agents-cli 官方部署規範(Sizing a Deployment):
- 直接使用
agents-cli deploy部署時(預設 Scale to Zero):- CLI 的預設資源配置與 Cloud Run 完全一致:
--cpu 1、--memory 4Gi、--concurrency 8、--min-instances 0、--max-instances 10。 - 也就是說,當沒有流量進入 Agent Runtime 時,Instance 數量會自動縮減為
0;而 Agent Runtime 的計費方式是依實際分配的 vCPU-hours 與 Memory-hours 計算,當閒置縮容到 0 時,完全不會產生運算費用!
- CLI 的預設資源配置與 Cloud Run 完全一致:
- 使用 Terraform (
service.tf) 部署正式環境時(預設min_instances = 1):- 當你為生產環境產生 Terraform IaC(
deployment/terraform/single-project/service.tf)時,範本預設會將min_instances設為1,目的是避免正式環境的第一位使用者遇到容器冷啟動(Cold Start)。 - 如果你的正式環境也希望省錢、允許幾秒鐘的 Cold Start,隨時可以在部署時指定
agents-cli deploy --min-instances 0,或在service.tf中將min_instances改回0。
- 當你為生產環境產生 Terraform IaC(
💡 為什麼 LINE Bot 搭配 Agent Runtime 最適合「雙層解耦架構」?
理解了 Agent Runtime 的特性後,你會發現把系統拆成兩層是絕配:
- 外層:LINE Webhook Gateway(Cloud Run,
min-instances=0): 因為 LINE 伺服器發送 Webhook 時,只會帶X-Line-SignatureHMAC 簽章,無法攜帶 Google Cloud IAM OAuth Token 去呼叫受 IAM 保護的 Agent Runtime API。用一個超輕量的 Go Cloud Run 服務專門負責「在 1 秒內驗章、回傳 HTTP 200、觸發 LINE Loading 動畫」,平時沒人傳名片時完全 Scale to 0。 - 內層:核心大腦(Agent Runtime,
min-instances=0): 專心運行 ADK 2.0 Graph Workflow、管理雲端持久化VertexAiEngineSessionService(確保 HITL 暫停狀態跨容器不遺失!),並同時對企業內部公開 A2A (/.well-known/agent-card.json) 與 Agent Engine Playground!
二、規劃遷移藍圖:使用 GitHub CLI 建立 5 階段 Roadmap
為了有條不紊地完成這次架構演進,我們先在 GitHub Repository (kkdai/line-card-assistant) 中使用 gh CLI 建立了完整的 5 個 Milestones (Phases)、8 個實作 Issues 與總覽追蹤清單 Roadmap Issue #9:
- Phase 1:
agents-cli環境與adk_go專案 Scaffolding(本篇實作重點!) - Phase 2: ADK Go Graph Workflow 雲端儲存與持久化適配
- Phase 3: LINE Webhook Gateway 與 Agent Runtime 解耦架構
- #6 實作 LINE Webhook Gateway (Cloud Run) 與 Agent Runtime 雙層解耦呼叫架構
- Phase 4:
agents-cli eval自動化評估與基準測試- #7 建立
agents-cli eval評估資料集與品質飛輪 (OCR、Fan-Out/Fan-In、HITL 迴圈、Hybrid Search)
- #7 建立
- Phase 5: Agent Runtime 正式部署、IaC 與可觀測性
- #8 透過
agents-cli deploy部署至 Agent Runtime 並建立 Terraform IaC、CI/CD 與 Cloud Trace 可觀測性
- #8 透過
三、Phase 1 實戰拆解:把既有 Go 專案改造為 adk_go + agent_runtime 雙通道架構
在 Phase 1(對應已合併之 PR #10)中,我們的目標是:保留原本 cmd/server/main.go 的獨立 LINE Webhook 伺服器,同時在專案根目錄導入 agents-cli (adk_go + agent_runtime) 的標準架構,讓同一個 Codebase 同時具備兩種超能力!
我們來看看這次升級到底改了哪些關鍵檔案,以及帶來了什麼新功能:
line-card-assistant/
├── .agents-cli-spec.md          # [新增] Phase 0 架構規格書 (Single Source of Truth)
├── agents-cli-manifest.yaml     # [新增] agents-cli v1.10.0 專案設定檔 (adk_go + agent_runtime)
├── deployment_metadata.json     # [新增] 記錄遠端 Agent Runtime 資源 ID 與 A2A 狀態
├── main.go                      # [新增] Agent Runtime / ADK WebUI / A2A 標準 HTTP 入口
├── apploader.go                 # [新增] 支援 /ui/?app=app 與 rootAgent.Name() 的雙別名 Loader
├── appurl.go                    # [新增] 自動推算 Cloud Run / Agent Runtime 外部公開 URL (供 A2A Card 使用)
├── observability.go             # [新增] OpenTelemetry Cloud Trace / Logging / Metrics 自動掛載
├── app/
│   ├── agent.go                 # [新增] 標準匯出介面:NewRootAgent(ctx) 回傳 12 節點 Graph Workflow
│   └── agent_test.go            # [新增] 直接透過 ADK Runner 驗證 Root Agent 執行與搜尋輸出
├── appinfo/
│   └── appinfo.go               # [新增] GET /app-info 端點,自動解析 Root Workflow 與內嵌之 CompanyEnrichAgent
├── sessions/
│   └── sessions.go              # [新增] 自動切換 VertexAiEngineSessionService 與本地 InMemoryService
├── cmd/server/main.go           # [保留] 原本的獨立 LINE Bot Webhook 伺服器
└── internal/workflow/           # [強化] Graph Workflow 節點升級支援雙通道輸入與串流 Content 輸出
1. 建立 agents-cli-manifest.yaml 與 .agents-cli-spec.md
要讓 agents-cli 認得一個 Go 專案,核心關鍵在於根目錄的 agents-cli-manifest.yaml:
# Managed by agents-cli. Do not edit manually.
acli_version: "1.10.0"
project_name: "line-card-assistant"
root_agent_name: "line_card_assistant"
base_template: "adk_go"
language: "go"
framework: "google-adk"
deployment_target: "agent_runtime"
agent_directory: "app"
region: "asia-east1"
agent_guidance_filename: "GEMINI.md"
is_a2a: true
prototype: true
generated_at: "2026-10-17T16:12:00Z"
設定完成後,我們在專案根目錄執行 agents-cli info,CLI 就能立刻辨識出這是一個支援 A2A、目標部署於 asia-east1 Agent Runtime 的 Go 專案:
$ agents-cli info
CLI version:        1.10.0
Project root:       /Users/evanlin/Documents/line-card-assistant
Project name:       line-card-assistant
Root agent name:    line_card_assistant
Language:           go
Deployment target:  agent_runtime
Agent directory:    app
Region:             asia-east1
A2A:                yes
2. 封裝標準 Root Agent 入口:app/agent.go
在 adk_go 模板規範中,所有的 Agent 邏輯都應該透過 app package 下的 NewRootAgent(ctx context.Context) (agent.Agent, error) 匯出。
因為我們在第一篇中已經使用 ADK 2.0 的 workflowagent.New 將 12 個節點的 Graph Workflow 封裝成標準的 agent.Agent,所以在 app/agent.go 中,我們只需要負責初始化底層的 CardStore(SQLite 或 Memory)與 model.LLM(自動偵測 Vertex AI ADC 或 Gemini API Key),再呼叫 workflow.NewCardAssistantAgent 即可無縫接軌!
package app

import (
	"context"
	"log/slog"
	"os"
	"strings"

	"github.com/kkdai/line-card-assistant/internal/config"
	"github.com/kkdai/line-card-assistant/internal/store"
	"github.com/kkdai/line-card-assistant/internal/workflow"
	"google.golang.org/adk/v2/agent"
	"google.golang.org/adk/v2/model"
)

const RootAgentName = workflow.WorkflowName // "line_card_assistant"

// NewRootAgent constructs the root ADK v2 Graph Workflow agent for Agent Runtime,
// ADK WebUI playground, A2A server, and evaluation CLI.
func NewRootAgent(ctx context.Context) (agent.Agent, error) {
	cfg := config.Load()

	var cardStore store.CardStore
	if strings.TrimSpace(cfg.SQLitePath) != "" {
		sqliteStore, err := store.NewSQLiteStore(cfg.SQLitePath)
		if err != nil {
			slog.Warn("failed to open SQLite store, falling back to in-memory store", "err", err)
			cardStore = store.NewMemoryStore()
		} else {
			cardStore = sqliteStore
		}
	} else {
		cardStore = store.NewMemoryStore()
	}

	var llm model.LLM
	if cfg.UseVertexAI || cfg.GoogleAPIKey != "" || os.Getenv("GOOGLE_CLOUD_AGENT_ENGINE_ID") != "" {
		realLLM, err := workflow.NewGeminiModel(ctx, cfg.GeminiModel, cfg.GoogleAPIKey, cfg.UseVertexAI, cfg.GoogleCloudProject, cfg.GoogleCloudLocation)
		if err != nil {
			slog.Warn("failed to initialize Gemini model, falling back to mock LLM", "err", err)
			llm = workflow.NewMockLLM()
		} else {
			llm = realLLM
		}
	} else {
		llm = workflow.NewMockLLM()
	}

	return NewRootAgentWithDeps(cardStore, llm)
}

func NewRootAgentWithDeps(cardStore store.CardStore, llm model.LLM) (agent.Agent, error) {
	return workflow.NewCardAssistantAgent(cardStore, llm)
}
注意這裡的一個巧思:當部署在 Agent Runtime 時,系統會自動注入 GOOGLE_CLOUD_AGENT_ENGINE_ID 環境變數;而在跑單元測試(go test ./...)且未設定 API Key 時,它會自動退回 workflow.NewMockLLM(),讓離線測試依然保持 100% 快速且確定性通過!
3. Agent Runtime 標準 HTTP Server 與 A2A 端點(Root main.go)
接著我們來看專案根目錄新增的 main.go。當容器部署到 Agent Runtime(或在本機執行 make playground)時,這個入口會一次掛載五大標準服務:
- OpenTelemetry 可觀測性(
setupObservability):自動將 Traces、Logs 與 Metrics 匯出至 Google Cloud Trace 與 Cloud Logging。 - Session 服務自動切換(
sessions.SessionService()): 在sessions/sessions.go中,只要偵測到VERTEX_AI_SEARCH_ENGINE_ID(Agent Engine ID),就會自動啟用雲端持久化的NewVertexAiEngineSessionService;本機開發則無縫使用session.InMemoryService()。 - ADK REST API 與 WebUI(
/api/與/ui/): 直接透過api.NewLauncher()與webui.NewLauncher()啟動 ADK 內建的串流對話 API 與網頁除錯介面。 - A2A (Agent-to-Agent) 協定伺服器:
自動在
/.well-known/agent-card.json公開這個 Agent 的能力描述卡(AgentCard),並在/a2a/app提供 JSON-RPC 調用端點! - Agent 結構自省端點(
GET /app-info): 透過appinfo/appinfo.go分析整棵 Agent Tree,不僅能列出 Root Graph Workflow,還會把內嵌在CompanyEnrichNode裡面、掛載了geminitool.GoogleSearch{}的CompanyEnrichAgent(gemini-2.5-flash) 一併註冊到/app-info回應中,讓agents-cli eval與 Google Cloud Console Playground 能夠清楚看見系統內部的所有子代理與工具!
4. 關鍵改造:讓 Graph Workflow 同時支援「LINE Webhook」與「ADK WebUI / A2A」雙通道!
在第一版中,我們的 RouterNode 假設所有的輸入都來自 LINE Webhook Handler 預先塞進 Session State 的 StateKeyInputType 或 StateKeyImageBytes;而且各個終端節點(如 FormatCarouselNode、BuildPreviewNode、SaveCardNode)只把結果寫入 StateKeyReplyText 與 StateKeyFlexCarouselJSON,供 LINE Bot 取出後呼叫 ReplyMessage 推播。
但是,當我們開啟 ADK WebUI (make playground)、Agent Engine Console Playground 或是透過 agents-cli run "幫我找做 AI 的人" 直接跟 Root Agent 對話時,輸入是走標準的 ADK ctx.UserContent()(包含文字 Part.Text 或上傳圖片 Part.InlineData),而輸出則是讀取事件串流中的 ev.Content!
因此,我們在 internal/workflow/nodes_ingest.go 與 internal/workflow/nodes_search.go 做了兩項完全向下相容的強化:
(1) RouterNode 自動解析 ctx.UserContent() 的圖片與文字
// 當直接從 ADK WebUI / A2A / Agent Engine Playground 上傳名片圖片時,
// 自動從 ctx.UserContent().Parts 取出 InlineData.Data 並導向 RouteIngest!
if len(getBytesState(ctx, StateKeyImageBytes)) == 0 && ctx.UserContent() != nil {
	for _, part := range ctx.UserContent().Parts {
		if part != nil && part.InlineData != nil && len(part.InlineData.Data) > 0 {
			setState(ctx, ev, StateKeyImageBytes, part.InlineData.Data)
			if getStringState(ctx, StateKeyInputType) == "" {
				setState(ctx, ev, StateKeyInputType, RouteIngest)
			}
			break
		}
	}
}

// 若為文字輸入且 input 參數為空,自動從 ctx.UserContent().Parts 擷取查詢文字或指令
if inputType == "" {
	sTrim, _ := input.(string)
	sTrim = strings.TrimSpace(sTrim)
	if sTrim == "" && ctx.UserContent() != nil {
		for _, part := range ctx.UserContent().Parts {
			if part != nil && strings.TrimSpace(part.Text) != "" {
				sTrim = strings.TrimSpace(part.Text)
				break
			}
		}
	}
	// 自動判斷是搜尋名片 (RouteSearch) 還是產生破冰信 (action=draft_email&card_id=...)
    ...
}
(2) 終端節點同步寫入 ev.Content
在 BuildPreviewNode、SaveCardNode、FormatCarouselNode 與 EmailDraftNode 中,除了原本寫入 StateDelta 給 LINE Bot 讀取外,我們加上了一行:
ev.Content = genai.NewContentFromText(flexJSON, genai.RoleModel)
這麼一來:
- 從 LINE 傳名片或查名片:LINE Webhook 一樣從
StateDelta拿到 Flex JSON 渲染出漂亮的 LINE 卡片。 - 從 ADK WebUI (
make playground) 或 Agent Engine Playground 測試:不需透過 LINE 帳號,直接在瀏覽器上傳一張名片圖片或輸入「幫我找在 Cloud Summit 認識做 AI 的人」,就能在對話視窗直接看到完整的執行軌跡(Graph Node 跳轉)與輸出的 Flex JSON / 破冰信草稿!
我們也在 app/agent_test.go 中新增了 TestRootAgentDirectSearchExecution 單元測試,直接用標準 ADK runner.Runner 對 app.NewRootAgent 發送 genai.Content 查詢,驗證不經過 LINE Engine 也能直接從 Event Stream 取得名片 Carousel JSON!
5. Multi-binary Dockerfile:一個映像檔同時搞定 Agent Runtime 與 LINE Webhook
最後,為了讓同一個容器映像檔既能被 agents-cli deploy 部署到 Agent Runtime,又能被部署到 Cloud Run 作為獨立 LINE Bot 伺服器,我們更新了 Dockerfile,在 Multi-stage Build 中一次編譯出兩支靜態執行檔:
# Build the Agent Runtime / ADK WebUI / A2A entrypoint binary (root main.go)
RUN CGO_ENABLED=0 GOOS=linux GOARCH=amd64 go build -ldflags="-s -w" -o /out/agent .

# Also build the standalone LINE Bot Webhook server binary (cmd/server/main.go)
RUN CGO_ENABLED=0 GOOS=linux GOARCH=amd64 go build -ldflags="-s -w" -o /out/line-card-assistant ./cmd/server
- 預設
ENTRYPOINT ["/agent"]會啟動 Agent Runtime 標準伺服器(監聽0.0.0.0:8080)。 - 若在 Cloud Run 需要作為單體 LINE Webhook Server 執行,只需將 Container Command 指定為
/bin/line-card-assistant即可!
四、總結與下一步預告
透過 Phase 1 的改造(PR #10),我們的 LINE AI 名片王 (line-card-assistant) 已經正式從一個單純的 LINE Bot 應用程式,蛻變為符合 Google Cloud Agent Platform 標準的 adk_go Agent:
- 完整支援
agents-cli生態系:具備agents-cli-manifest.yaml與.agents-cli-spec.md。 - 雙通道執行能力:既能透過 LINE 聊天室互動,也能直接透過
make playground開啟 ADK WebUI、透過 A2A 協定讓其他 Agent 呼叫、或在 Agent Engine Playground 直接進行多模態名片辨識與搜尋測試。 - 雲端原生準備就緒:內建
VertexAiEngineSessionService自動切換與 OpenTelemetry Cloud Trace 追蹤能力。
在下一篇系列文章中,我們將進入 Phase 2 & Phase 3,實際將 HITL 暫停狀態與圖片 Artifact 接上雲端持久化儲存,並把系統拆解為「Cloud Run LINE Webhook Gateway + Agent Runtime 核心大腦」的雙層解耦架構,敬請期待!
參考資源與延伸閱讀
- 系列文第一篇:[Agent Platform 實戰 (1)] 用 Go 與 Google ADK 2.0 Graph Workflow 打造 LINE AI 名片王:從 Fan-Out 平行檢索到 HITL 暫停迴圈修正
- 本專案開源程式碼與 Roadmap:
- GitHub Repository:kkdai/line-card-assistant
- Agent Runtime 遷移總覽 Roadmap:Issue #9
- Phase 1 實作 Pull Request:PR #10: feat(phase1): scaffold adk_go Agent Runtime project structure and app.NewRootAgent
- Google
agents-cli與 Agent Platform 官方文件: - Google ADK Graph Workflow 官方文件:
- ADK (3) ,
- ADK 2.0 (2) ,
- Agent Platform (2) ,
- Agent Runtime (1) ,
- agents-cli (1) ,
- Graph Workflow (2) ,
- Golang (71) ,
- LINEBot (31) ,
- A2A (3)

